|
|
Nandbin Melonds Top |top| -To prevent compatibility issues, it is highly recommended to select the Format option in DSi-mode settings to properly initialize the NAND file in MelonDS. 3. Fixing "NandBin Top" and Display Issues , layout options (like "Hybrid View") are managed through the Quick Menu > Core Options rather than the standalone emulator's menus. Save Stability layout, you should consider the emulator's specific requirements for DSi emulation and its various display modes. 1. Understanding NAND.bin in melonDS "Put back my top!" shouted the fruit with a frown, "I need it to keep all my seeds safely down!" Timothy froze, holding the leafy green cap, Realizing he’d fallen right into a trap. nandbin melonds top : While "savestates" are convenient, it is highly recommended to use the game's internal save feature (which writes to the NAND/SAV files) for long-term stability, as emulator updates can sometimes break old savestates. from a physical DSi, or more details on RetroArch-specific screen layouts? If you do only one thing, do this. The is the single most important performance setting. It translates Nintendo DS instructions into native code your PC understands on the fly. This change alone can boost performance by 30% to 50% . It is located in Config > Emu Settings > CPU . Check the box to unlock instant smoothness in previously laggy areas (like Castelia City in Pokémon Black/White ), as it's the most critical setting to address real lag in demanding areas. Older emulators, like DeSmuME or early versions of DraStic, often used high-level emulation (HLE) for the firmware. They simulated the functionality of the DS menu without actually running the code. While this was faster, it was less accurate. To prevent compatibility issues, it is highly recommended /melonds/ ├── melonds.exe (or .app/.x86_64) ├── bios/ │ ├── bios7.bin │ ├── bios9.bin │ ├── firmware.bin │ ├── dsi_bios7.bin │ ├── dsi_bios9.bin │ ├── dsi_firmware.bin │ └── dsi_nand.bin └── roms/ └── (your .nds files here) : If you only see the top screen, check Config > Video Settings and ensure you haven't accidentally disabled the dual-screen layout or set it to an "emphasized" mode that hides the bottom panel. For the best visual quality without sacrificing speed, set the to OpenGL in the video settings. This offloads the hard work from your CPU to your graphics card, resulting in cleaner battle effects and fewer stutters. It also resolves specific touch screen crash issues found in titles like Pokémon Platinum and allows for higher-resolution upscaling. Save Stability layout, you should consider the emulator's Avoid placing your melonDS executable or system files inside protected system folders like Windows C:\Program Files . User Account Control (UAC) restrictions can block the emulator from writing data, preventing settings from saving and corrupting the virtual NAND link. Instead, create a dedicated folder on your desktop or a custom directory (e.g., C:\Emulators\melonDS ). What would one find at the Nandbin Melonds Top? The answer is nothing—and everything. Unlike a traditional summit, which offers a panoramic view of conquered territory, the Top of Melonds offers a view inward. Standing there, the climber realizes that the “melonds” were not external objects but fragments of their own perception, each one a memory, a fear, a hope, that had been rounded and softened by time. The Top is the point where past and future collapse into a single, overwhelming present. It is the apex of awareness. |
Nandbin Melonds Top |top| -Since different computers have different configurations, some old model computer may install the games slowly. Here is a tip which make your computer speed up in installing the PS2 games:
*NOTE* USB Extreme Win32 utility (Windows GUI) - Allows easy installation from your CD/DVD drive to your USB HDD USBInsane (Windows GUI) - Allows you to install an ISO stored on the PC HDD as well as the CD/DVD drive. USBeXtreme (DOS) - The setup program containing the format and install software The DOS version is more stable and has a higher success rate for proper installations, but is not as simple as the GUI version. So we will guide you thru the DOS version. USBeXtreme User Manual(MS-DOS mode) Before Starting: To use the USBeXtreme on your PS2, you will need a USB Hard drive Enclosure with Hard drive installed (both devices are sold separately), either 3.5' or 2.5' USB Hard drive Enclosure with Hard drive can be use. *For the installation of a Hard Drive into your USB enclosure, please refer to the user manual of the USB Enclosure if its the removable type. Hard Drive preparation If you are using a new
hard drive, you will need to initialize the hard drive with Windows
2000/XP.(For Windows 98/ME
user, you will need other Disk Management software, like, Partition
Magic to initialize and format the harddisk) To initialize the
hard drive, connect the hard drive enclosure to your PC's USB port and install the
driver if its
required, then go to Start
and right
click My Computer >
Manage
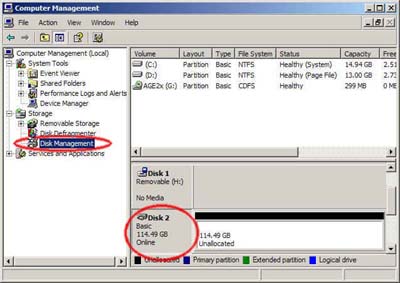
> Disk Management. * For the driver installation, please refer to the user manual of the hard drive enclosure* After that you will able to view all drives installed in your PC, select the newly installed hard drive, right click and choose "initialize", follow the on screen instruction and the hard drive will be initialized by your PC and assign a driver letter to it. You can format the drive by using NTFS format in order to use up the maximum space of the hard drive. Create a Primary Partition of the max space available.
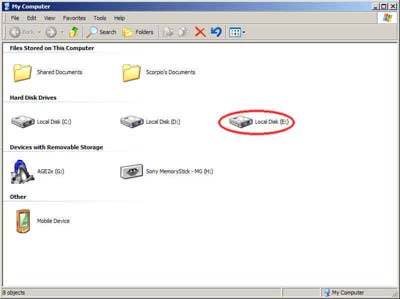
If the hard drive has formatted and assigned a drive letter successfully, you will see a new drive in "My Computer"
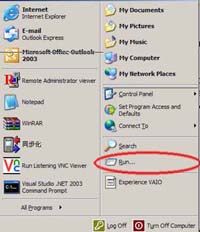
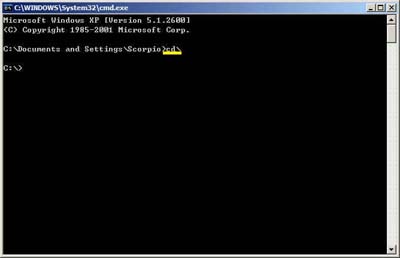
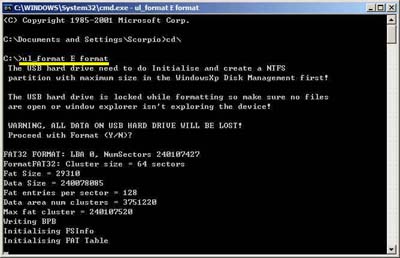
Formatting for USBeXtreme Download the DOS software of USBeXtreme from the link above, unzip the file and run the USBeXtreme_setup.exe file, then the tools will be extracted into the drive C. Please DO NOT change the default installation path except you are familiar with MS-DOS command. After extracted the USBeXtreme Client software, go to "Start" then "Run", Enter "Command" or "CMD" to open a command prompt. Change the directory to the root directory C drive by entering command cd\ and press enter, you will see C:\> appear on the command line. You can refer to the following picture.
Then you can enter the following command. ul_format X format "X" is the drive letter of your USB hard drive.
The format action will take a
few minutes, it is depends on the capacity of the partition you
created, please DO NOT remove the hard drive or power off the USB
harddisk enclosure during this period.
Game Converting To convert games from CD/DVD drive to the USB hard drive, please connect the USB drive to your PC, then go to command prompt "Start" > "Run" > enter Command or CMD, change the directory to the root directory C drive by entering command cd\ and press enter, you will see C:\> appear on the command line. You can refer to the following picture.
This is the DOS command required to install. [color coded for easy understanding] ul_install SourceDrive TargetDrive GameName Disc e.g. if your DVD/CD-Rom drive is drive D, and the USB harddisk is E, and you are converting a PS2 DVD game "Metal Gear Solid", the command will be the following ul_install D E MetalGearSolid DVD you can refer to the following picture 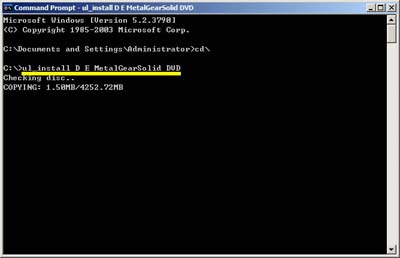
Game converting will take a
few minutes depending on the game disc size.
Game Playing Connect and power on the USB
harddisk to your PS2 and boot your PS2 with USBeXtreme, when you see
the game selection menu, select the game and press X on the joypad, the
game will then run immediately.
|
|
|